Monday, February 13, 2017
Tuesday, February 7, 2017
How to: Thumbnailing
Thumbnailing
Goal: Understanding the importance and simplicity of thumbnails.Check out this perfect explanation of why we thumbnail. SOURCE: Tristan Yuvienco
What thumbnails are: simple, messy, quick, not always right
What thumbnails are NOT: perfect, super detailed, time consuming
Each thumbnail should take you around 5 minutes. They are ideas and concepts and can be as silly and quick as they need to be for you to understand them.
One rule: DO NOT COPY OR TRACE. This needs to be YOUR work.
Saturday, February 4, 2017
Warm-ups: What are they?
Every muscle needs practice, and art uses more than one. Before buckling down to focus on work, make sure you always stretch out your arm, your mind, and your mindset by warming up!
At the beginning of each week, create a new canvas:
3000 px width
2000 px height
300 dpi resolution
Name: Lastname_firstname_week1 (week2, week3 etc.)
This will become your sketchbook page for the week! Any warm-ups we do at the start of class will be done on this file. They will then be turned in as a .jpg at the end of the week.
When sketching, always sketch as much as you can. This is a workout! Credit will be given based off filling the page by the end of the week.
You will be prompted on what to draw by me each time we warm-up. Use it as a time to improve and expand your skills!
Brushes: How to Make a Brush in PS
Step 1: Create a new
brush tip shape
Open up a new canvas (ctrl+n)
-
Recommended around 300 x 300px and 300dpi.
Anything larger may cause your computer to lag.
On a new layer, begin drawing out the shape or texture you
wish.
-
Note: the brush tip shape only registers black
and white. Draw in black.
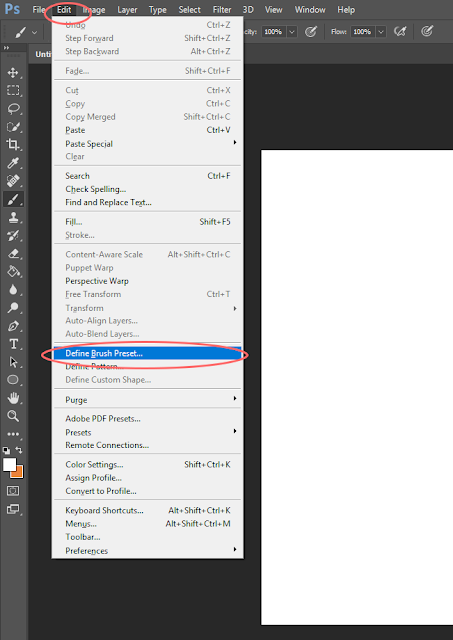
Save your brush tip shape. Go to Edit > Define Brush
Preset
-
Name the brush tip shape whatever you wish and
hit ‘Ok’
Step 2: Adjusting
your brush settings
Open the ‘Brush’ window by going to Window > Brush
In the new pop up window, navigate around the settings to
change attributes of your brush.
Most commonly used attributes to play with are:
-
Brush Tip Shape > Spacing: adjusts how far
apart your shapes are
-
Shape Dynamics > Size Jitter: as you paint,
the size of the shapes varies
-
Shape Dynamics > Angle Jitter: as you paint,
the angle of the shape varies
-
Scattering > Scatter: as you paint, the
shapes scatter
-
Color Dynamics > The jitters here will
transition the colors as you paint in various ways
Step 3: Saving your brush settings
In the Brush window you were just working in to adjust
settings, click on the menu at the top right.
Select New Brush Preset
Name this new brush and hit ‘Ok’
You will now be able to see and use your brush from the drop
down menu in Brush Mode!
Friday, February 3, 2017
Welcome Survey
Welcome to Digital Illustration!
Well we all survived our first week together, and I must say I'm excited to teach you all this semester! With our new site switched over I can now officially direct you to our class survey:
Please fill this survey out to the best of your ability. If you are in the Tues/Thurs class I have submitted your answers in already. Thank you!


